The HTML Document Structure
An HTML document has a certain structure and consists of several required sections. In this tutorial, we will explain the structure of an HTML document and create a simple HTML page.
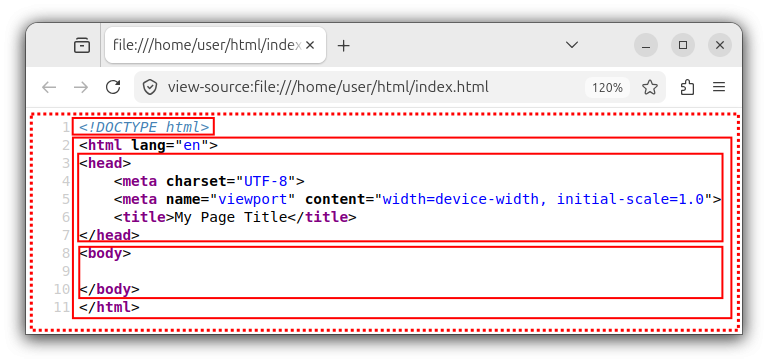
To follow this tutorial, create an empty index.html text file in your text editor.
The DOCTYPE declaration
Each HTML document starts with a required <!DOCTYPE html> wording/preamble at the top of the document. Our index.html file now looks like the following:
<!DOCTYPE html>
This declaration specifies that our document is of the HTML5 standard and tells the browser to use the standard rendering mode, the so-called no-quirks rendering mode.
Note: The DOCTYPE declaration is not case sensitive and can also be written as <!doctype html>.
The <html> section
Next, our HTML page has the <html> element, which is the root element that wraps all other elements on our page. The <html> element also has a lang attribute that specifies the language used in this element/page. The general syntax for the <html> element is:
<html lang="en"></html>
Now, our index.html page looks like the following:
<!DOCTYPE html>
<html lang="en">

</html>
Note: Replace "en" with "fr" for French, "es" for Spanish and so on.
The <html> section is used to store two important sub-sections (nested elements):
- The
<head>section/element. - And the
<body>section/element.
The <head> section
The <head> section/element is used to store the machine processing data, the so-called metadata, including the title of our page. The general syntax is:
<head></head>
The metadata section, placed inside the <head> element, specifies the following:
- The character encoding.
- The viewport settings.
- The title of the HTML page/document.
- Optionally, the CSS and JavaScript code or files to include.
- Other metadata info.
Character encoding
The document's character encoding is specified inside a <meta> element using the charset attribute:
<meta charset="some_encoding_value">
The recommended character encoding is utf-8, so the character encoding specification for our document becomes:
<meta charset="UTF-8">
Note: The <meta> element stores various metadata information and should always be placed inside the <head> element. The <head> element can store multiple <meta> elements.
Note: The character encoding specification should be the first metadata element inside the <head> section.
At this point, our (still incomplete) index.html document contains the following code:
<!DOCTYPE html>
<html lang="en">
<head>
    <meta charset="UTF-8">
</head>
</html>
The viewport data
To set the viewport's size and scaling, we use the name="viewport" and content="width=value1, initial-scale=value2" attributes inside the <meta> element:
<meta name="viewport" content="width=device-width, initial-scale=1.0">
This code sets the viewport's width in pixels and sets the scaling ratio to 1. The width can be hard-coded, or, as in our case, set to our device's screen width in pixels.
The initial-scale represents the ratio of the device's width and the viewport size. If the device is in landscape mode, it represents the ratio between the device's height and the viewport size.
Note: Including viewport data makes our site responsive to changes in devices' screen width and layout.
Our index.html file now looks like the following:
<!DOCTYPE html>
<html lang="en">
<head>
    <meta charset="UTF-8">
    <meta name="viewport" content="width=device-width, initial-scale=1.0">
</head>
</html>
The document's title
The <title> metadata element specifies the document's title. The general syntax is:
<title>My Page Title</title>
Note: The document's title is displayed in the browser tab, search engine results pages, and saved bookmarks.
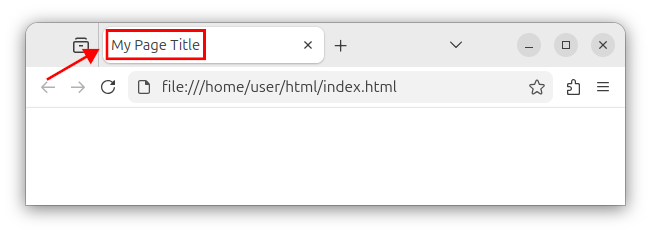
Let us add the <title> element to our index.html file:
<!DOCTYPE html>
<html lang="en">
<head>
    <meta charset="UTF-8">
    <meta name="viewport" content="width=device-width, initial-scale=1.0">
    <title>My Page Title</title>
</head>
</html>
Other elements in the <head> section
The <head> element can also include other elements, such as: <style>, <script>, and <link> elements, which allow us to:
- Declare or import the CSS style sheet.
- Declare or import the JavaScript code.
- Set the icon, and more.
We will have dedicated tutorials for each of these later in this course.
The <body> element
The <body> element represents the visible content of an HTML document. It is used to store headings, paragraphs, images, lists and many other visible elements in our HTML page.
The <body> element follows the <head> element and uses the following syntax:
<body></body>
Our index.html file now looks like the following:
<!DOCTYPE html>
<html lang="en">
<head>
    <meta charset="UTF-8">
    <meta name="viewport" content="width=device-width, initial-scale=1.0">
    <title>My Page Title</title>
</head>
<body>

</body>
</html>
Important: This is the basic HTML document structure that all our HTML documents should follow.
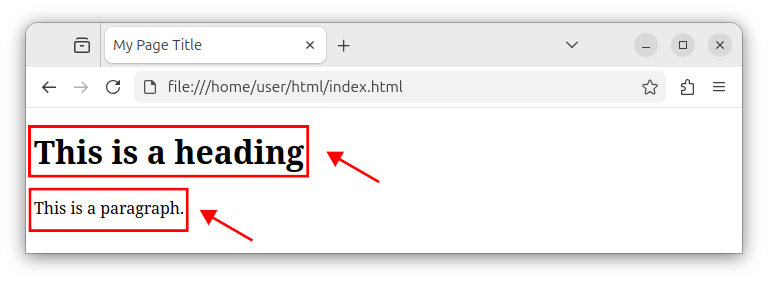
For demonstration purposes, we can add heading and paragraph elements to our <body> element:
<body>
    <h1>This is the H1 heading</h1>
    <p>This is a paragraph.</p>
</body>
The complete index.html file listing is:
<!DOCTYPE html>
<html lang="en">
<head>
    <meta charset="UTF-8">
    <meta name="viewport" content="width=device-width, initial-scale=1.0">
    <title>My Page Title</title>
</head>
<body>
    <h1>This is a heading</h1>
    <p>This is a paragraph.</p>
</body>
</html>
Our HTML page now displays a level 1 heading and a paragraph text:
Summary
In this tutorial, we learned about the basic HTML document structure which includes the use of:
- The
<!DOCTYPE html>declaration. - The
<html>element. - The
<head>element. - The
<body>element.
In our next article, we will learn about other metadata content that can be stored inside the <head> section.


