Creating Table Columns in Laravel
This tutorial explains how to create table columns using the Schema::create() function and the Blueprint object's methods in our migrations.
Creating a migration file
Let us create a migration file that automatically creates a table, called for example, columns_tutorial. In our terminal, we write:
php artisan make:migration create_columns_tutorial_tableLet us open this newly created and prefilled migration file. The migration file uses the Schema::create() function to create a table called columns_tutorial and also define a few columns for this table.
This function accepts a table name as a first parameter and a closure with a Blueprint object, here named $table, as a second parameter.
We create columns by using the $table object to invoke different methods. By default, our framework has already created several columns in our function body. We can delete those statements from the Schema::create() function, so that our function now looks like the following:
Schema::create('columns_tutorial', function (Blueprint $table) {
    // we will add columns here
});
The id() method
The id() method creates an AUTO_INCREMENT, UNSIGNED, bigint, PRIMARY KEY column that represents the table's ID field.
Most of the time, tables usually have an id column of some kind. This column is usually auto-incrementing, is of some integer type and has a primary index. The Laravel framework offers a convenient method called id() that creates a column with all these properties.
By calling the id() method on our Blueprint object, we are creating a column with the default name of id. Let us add this method call to our Schema::create() function body:
Schema::create('columns_tutorial', function (Blueprint $table) {
      $table->id(); // create a column, named id, with the following properties:
      // AUTOINCREMENT, UNSIGNED, bigint, PRIMARY KEY, indexed and unique
});
When used without parameters, the id() method creates a column called ‘id’. To create a column with another name, we pass the custom column name as a parameter to the id() method:
$table->id('myid'); // create an AUTOINCREMENT, UNSIGNED, bigint, PRIMARY KEY, indexed and unique column, called myidThe id() method is a quick and convenient way of creating an ID column with all the usual attributes.
The string() method
The string() method creates a table column of type VARCHAR with the default length of 255. To create this column, we invoke the string() method using our $table object and specify the column name. We will add this method call to our function:
Schema::create('columns_tutorial', function (Blueprint $table) {
      $table->id(); // create an AUTOINCREMENT, UNSIGNED, bigint, PRIMARY KEY, indexed and unique column, called id
      $table->string('my_string_field'); // create a VARCHAR column with a length of 255, called my_string_field
});
To specify a different length for our VARCHAR column, we supply the length as a second parameter to our string() method:
$table->string('my_string_field', length: 123); // create a VARCHAR column with a length of 123, called my_string_field
});
The text() method
The text() method is used to create a table column of type TEXT. This column can store up to 65,535 characters of text. Let us add this column to our existing Schema::create() function:
Schema::create('columns_tutorial', function (Blueprint $table) {
      $table->id(); // create an AUTOINCREMENT, UNSIGNED, bigint, PRIMARY KEY, indexed and unique column, called id
      $table->string('my_string_field'); // create a VARCHAR column with a length of 255, called my_string_field
      $table->text('my_text_field'); // create a TEXT column with a length of up to 65,535 characters, called my_text_field
});
If you need a longer text, you can use the following methods:
mediumText()method - creates aMEDIUMTEXTcolumn with the 16,777,215 limit.longText()method - creates aLONGTEXTcolumn with a maximum of 4,294,967,295 characters.
The timestamp() and timestamps() methods
The timestamp() method
The timestamp() method is used for creating a column of TIMESTAMP type.
To create a column of type TIMESTAMP, we invoke the timestamp() method on our Blueprint object. We can add the$table->timestamp('my_timestamp_field'); statement to our function, so that it now looks like:
Schema::create('columns_tutorial', function (Blueprint $table) {
      $table->id(); // create an AUTOINCREMENT, UNSIGNED, bigint, PRIMARY KEY, indexed and unique column, called id
      $table->string('my_string_field'); // create a VARCHAR column with a length of 255, called my_string_field
      $table->text('my_text_field'); // create a TEXT column with a length of up to 65,535 characters, called my_text_field
      $table->timestamp('my_timestamp_field'); // create a TIMESTAMP column, called my_timestamp_field
});
The timestamps() method
The timestamps() method is used for creating two TIMESTAMP columns, named created_at and updated_at.
For example, our page/blog post can be created at a certain time and updated at a different time. In some scenarios, it might be useful to add these two columns to our table. One column that specifies the time the post was created and the other column that specifies the time the post was updated. And the timestamps() method in Laravel does just that. These two columns can also be internally used by the Laravel framework, and we will discuss those use-scenarios in the upcoming chapters.
For now, let us add the timestamps() method call to our Schema::create() function:
Schema::create('columns_tutorial', function (Blueprint $table) {
      $table->id(); // create an AUTOINCREMENT, UNSIGNED, bigint, PRIMARY KEY, indexed and unique column, called id
      $table->string('my_string_field'); // create a VARCHAR column with a length of 255, called my_string_field
      $table->text('my_text_field'); // create a TEXT column with a length of up to 65,535 characters, called my_text_field
      $table->timestamp('my_timestamp_field'); // create a TIMESTAMP column, called my_timestamp_field
      $table->timestamps(); // creates two columns called created_at and updated_at, both columns are of the TIMESTAMP type
});
When we run this migration through the following command:
php artisan migrateOr through a fresh migration:
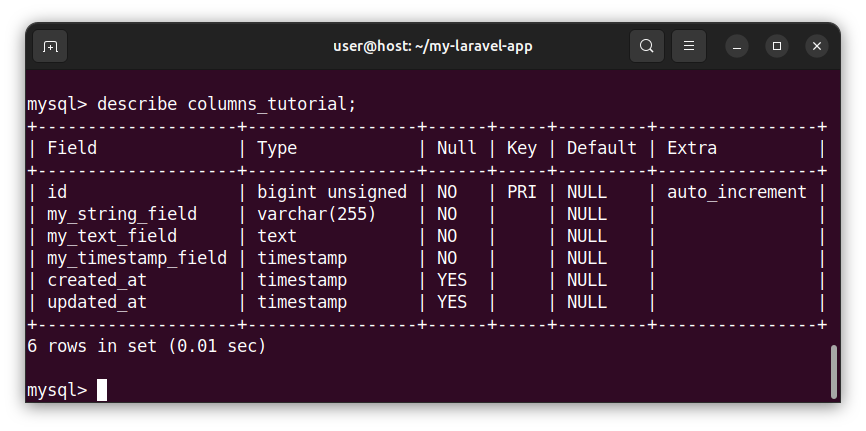
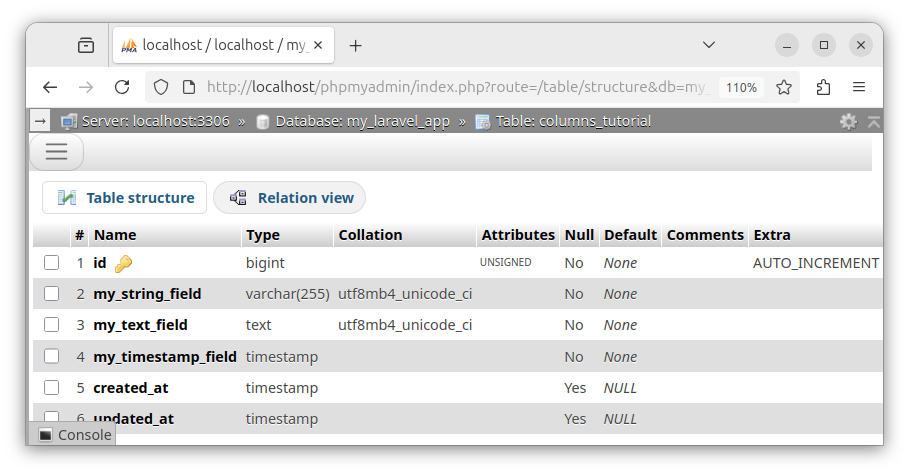
php artisan migrate:refresh #drops all tables and re-runs the migrationA new table, called columns_tutorial, will be created in a database. We created six different columns for this table. We manually specified the type for the first four columns and used the timestamps() method to create additional two columns.
We can use the MySQL command-line client to see the description of the newly created table columns:
The following image shows the table columns structure using a 3rd party phpMyAdmin database administration software:
Other column types
There are also other column types we can use. Here, we list some of them:
tinyInteger()
$table->tinyInteger('column_name');The tinyInteger() method creates a column of type TINYINT.
bigInteger()
$table->bigInteger('column_name');The bigInteger() method creates a column of type BIGINT.
unsignedTinyInteger()
$table->unsignedTinyInteger('column_name');The unsignedTinyInteger() method creates a column of type UNSIGNED TINYINT.
unsignedBigInteger()
$table->unsignedBigInteger('column_name');The unsignedBigInteger() method creates a column of type UNSIGNED BIGINT.
increments()
$table->increments('column_name');The increments() method creates a column of type AUTOINCREMENT UNSIGNED INT.
boolean()
$table->boolean('column_name');The boolean() method creates a column of type BOOLEAN.
char()
$table->char('column_name', length: 123);The char() method creates a column of type CHAR of a given length (0..255).
datetime()
$table->datetime('column_name', precision: 0);The datetime() method creates a column of type DATETIME. This method can also accept an optional fractional seconds parameter (up to 6 digits).
We will be introducing other types as we progress through this tutorial.
Summary
In this tutorial, we learned how to use migrations to create columns for our table. Inside the migration file, we used the Schema::create() function and Blueprint object to create a table and add columns to that table. In our next tutorial we will learn how to add modifiers to our table columns.


