Introduction to Models in Laravel
A model is a PHP class in a Laravel framework that represents a single table. We also use models to fetch table records, build relationships between tables, and create queries.
Note: Although we can still use raw SQL queries in Laravel, we mainly opt for Models when working with database records.
What are models?
Models are PHP classes that represent a table, and they extend the functionality of the existing Eloquent class. Eloquent is an object-relational mapper (ORM) framework used by Laravel to work with table records. For each table, we create a model and then use that model to manipulate table records.
Each Model that we create represents a certain database table, and lives in its own separate .php file. Behind the scenes, the framework uses models to build SQL queries and manipulate records. The workflow can be as follows:
- Create a table (if there is no existing table).
- Create a model for a table.
- Use the Model's methods to fetch records.
- Pass the fetched records to a view.
- Display the fetched records in a view.
Creating a table
We create a migration file that in turn creates the table. In the terminal, we write:
php artisan make:migration create_posts_tableWe open this newly created migration file which is named similarly to: 2025_10_25_123801_create_posts_table.php and paste the following source code:
<?php

use Illuminate\Database\Migrations\Migration;
use Illuminate\Database\Schema\Blueprint;
use Illuminate\Support\Facades\Schema;

return new class extends Migration
{
    /**
     * Run the migrations.
     */
    public function up(): void
    {
        Schema::create('posts', function (Blueprint $table) {
            $table->id();
            $table->string('title');
            $table->text('post_text');
            $table->timestamps();
        });
    }

    /**
     * Reverse the migrations.
     */
    public function down(): void
    {
        Schema::dropIfExists('posts');
    }
};
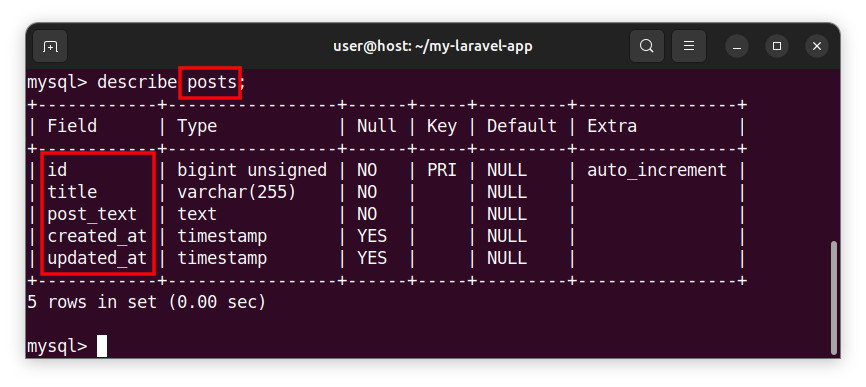
This code creates a table called posts and adds the following columns to a table:
- id
- title
- article_text
- created_at
- modified_at
To run this code, we invoke the migration in the terminal:
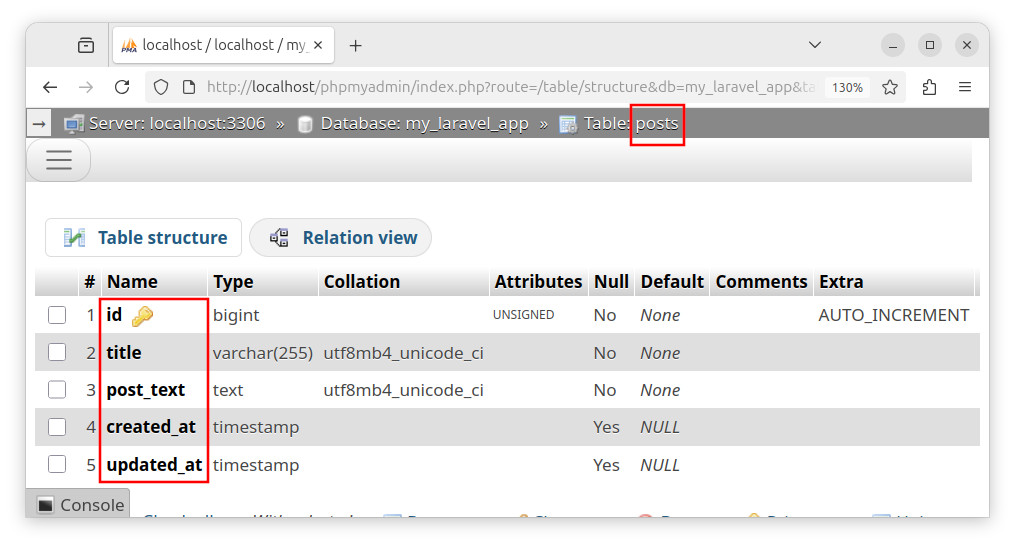
php artisan migrateOur database now has a posts table. To inspect the table's structure, we can use the MySQL command line tool:
Or the phpMyAdmin software:
To quickly insert a few sample records into our table, we invoke the artisan tinker tool in the terminal window:
php artisan tinkerOnce we are inside the artisan tinker tool, we execute the following code:
DB::table('posts')->insert([
    ['title' => 'The first post', 'post_text' => 'The text for the first post.', 'created_at' => now()],
    ['title' => 'The second post', 'post_text' => 'The text for the second post.', 'created_at' => now()],
    ['title' => 'The third post', 'post_text' => 'The text for the third post.', 'created_at' => now()],
]);
exit;
This code inserts three records into the posts table and exits the artisan tinker tool. The artisan tinker tool is a command line tool that allows us to execute the Laravel framework statements in a command line. It allows us to interact with the framework in the command line. We will have a dedicated chapter for this tool later on.
Creating a Model
Let us create a model, called Post, which represents the posts table. In the terminal, we write:
php artisan make:model PostThis command creates a new file called Post.php and places it in the app/Models folder. If we open the Post.php file, we see the following content:
<?php

namespace App\Models; // the Post class belongs to the App\Models namespace

use Illuminate\Database\Eloquent\Model; // import the Model class

// The Post class that extends the Eloquent's Model class
class Post extends Model
{
    // and is associated with a posts table by default
}
The file contains a Post class. The Post class extends the functionality of the existing Model class, which is a part of the Eloquent framework.
By default, the framework tries to automatically associate the model with a table whose name is the plural version of the model's name, a snake case plural version of the model's name.
If we follow the singular-model-name and the plural-table-name conventions, no extra work is required to associate the Post model with a posts table. It will be done automatically by the framework. In production, most of the time, we can follow the above naming conventions and automatically associate the model with the table. As an example:
- The Post model represents the posts table.
- The SomeName model represents the somenames table.
- The Article model would represent the articles table and so on.
If the table name is not the plural version of the Model's name, then, we can explicitly specify/set the custom name for our table by setting the following property in our model/class:
protected $table = 'custom_table_name';Fetching the table records
Now, we can use the Post model to fetch all the records from our posts table.
We open the web.php file, and paste the following code:
<?php

use App\Models\Post; // import the Post class (from the App\Models namespace)
use Illuminate\Support\Facades\Route; // import the Route facade

Route::get('/', function () { // define a route
    $myPosts = Post::all(); // fetch all records from the posts table
    return view('myposts', ['myPosts' => $myPosts]); // pass the records and return a view
});
This code imports the Post model (class) using the use App\Models\Post; statement. Then, inside the Route::get() function, we used the Post model's all() method to fetch all database records from the posts table and store the result in a $myPosts variable:
$myPosts = Post::all(); // fetch all records from the posts table The all() method returns an Eloquent's Collection that contains all the records from our table. This method returns an instance of the Illuminate\Database\Eloquent\Collection class which contains instances of the Post class, and each instance represents a single record.
Then, we pass the collection of fetched records (contained inside the $myPosts variable) to our view, and return a view to the index route:
return view('myview', ['myPosts' => $myPosts]); // pass the records and return a viewCreating a view
To display these records in a web page, we create a view (a template file) in the terminal:
php artisan make:view myviewWe open the newly created myview.blade.php template file from the resources/views folder and paste the following HTML code:
<!DOCTYPE html>
<html lang="en">
<head>
    <meta charset="UTF-8">
    <meta name="viewport" content="width=device-width, initial-scale=1.0">
    <title>Using a Model to fetch records</title>
</head>
<body>

    @foreach($myPosts as $myPost)
        <h1>{{ $myPost->title }}</h1>
        <p>{{ $myPost->post_text }}</p>
    @endforeach

</body>
</html>
We use the foreach loop to iterate over the collection of fetched records represented by the $myPosts variable. The underlying Collection type itself is not an array, but it can be iterated as an array. In each iteration the $myPost variable represents an instance (an object) of the Post class, it represents a single, current record. To get the value of a certain column, we access column names as properties of the $myPost object:
$myPost->column_name; // get the value of the given column nameIn our foreach loop, in each iteration, we display the values of the title and post_text columns using the following code:
<h1>{{ $myPost->title }}</h1>
<p>{{ $myPost->post_text }}</p>
Here, we opted to print the title column value as a text for the h1 heading element and the post_text column value as a text for the paragraph element in our web page.
Important: Once again, the $myPosts variable is an instance of the underlying Collection class that stores the results of the all() method's query. And the $myPost variable is an instance of a single result within that collection, an instance (an object) of the Post class that represents a single record.
Displaying database records
To display database records in our browser, we access the local http://127.0.0.1:8000 address and observe the following output.
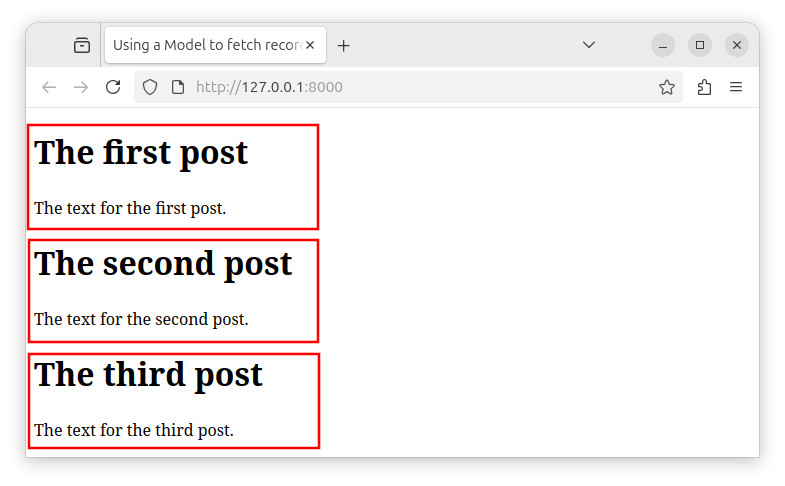
Our page now displays all three records from our posts table.
Summary
In summary, Models represent tables. We create a Model for each database table and then use that Model to interact with table records. First, we need to have a table, and then we create a Model which represents that table. Using the Model's functionality, we fetch the records and pass them to a view. Then, in a view, we iterate through a collection of fetched records and display the values.


